
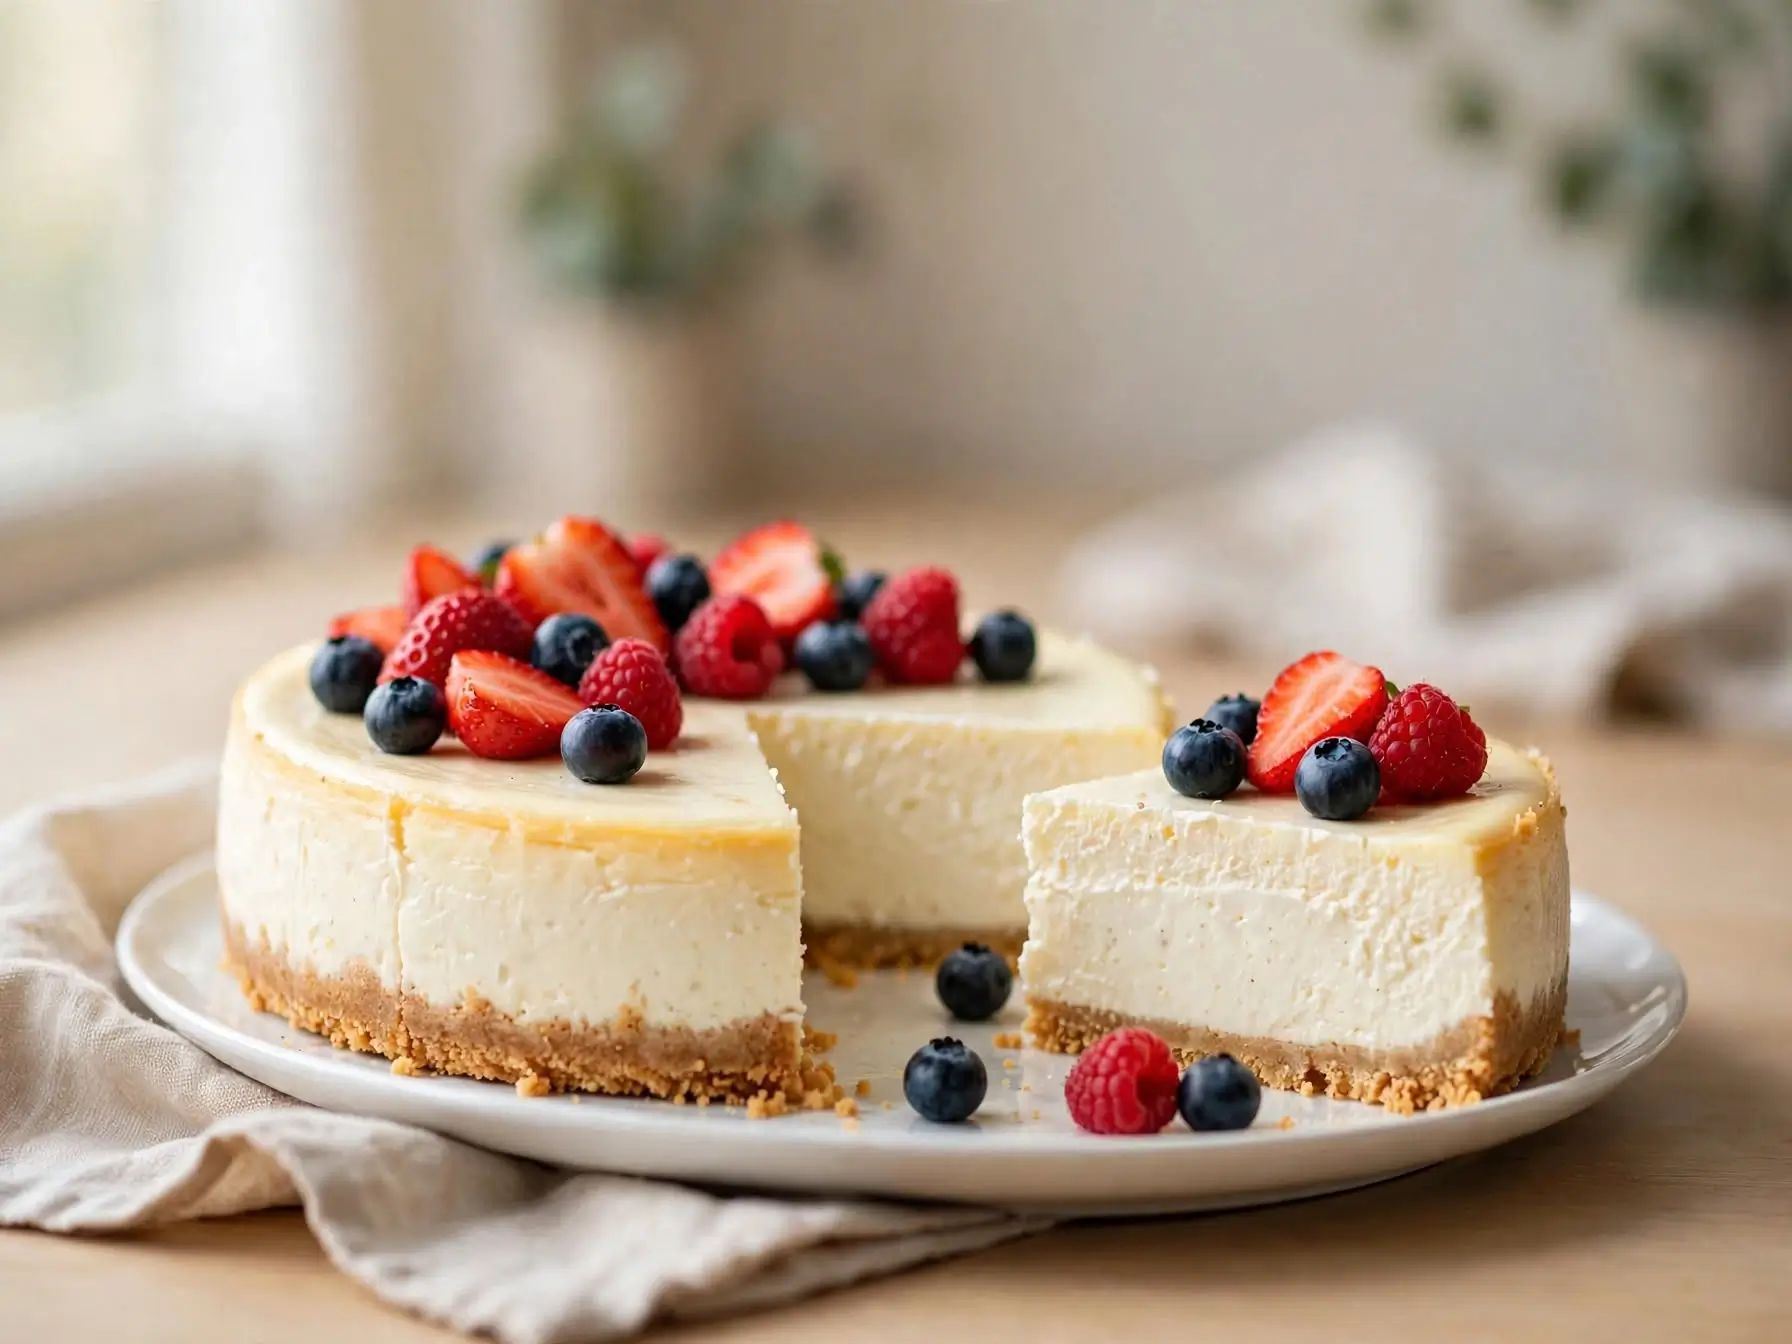
This Greek yogurt protein cheesecake is creamy, lightly sweet, and pleasantly tangy, with the classic texture you want from a cheesecake without feeling overly heavy. Greek yogurt and cottage cheese give the filling its protein, while a little vanilla and lemon juice bring out the cheesecake flavor. If you prefer a different base, there are more protein cheesecake variations to work from.
I like this recipe when I want a dessert that can be made ahead and kept in the refrigerator for several days. It slices neatly once chilled, and you can serve it plain or add fresh berries, a spoonful of Greek yogurt, or a light drizzle of honey.
Table of Contents
Greek Yogurt Protein Cheesecake
- Total Time: About 4 hours 50 minutes
- Yield: 8
Description
A creamy, lightly sweet cheesecake made with Greek yogurt, cottage cheese, and eggs for a simple high-protein dessert.
Ingredients
- 1 cup plain Greek yogurt
- 1 cup cottage cheese
- 2 large eggs
- 1/3 cup granulated sugar
- 2 tablespoons cornstarch
- 1 teaspoon vanilla extract
- 1 tablespoon fresh lemon juice
- Pinch of salt
Instructions
- Preheat the oven to 325°F. Lightly grease a 9-inch springform pan and line the bottom with parchment paper if desired.
- Add the cottage cheese to a blender or food processor. Blend until completely smooth.
- Add the Greek yogurt, eggs, sugar, cornstarch, vanilla, lemon juice, and salt. Blend just until smooth and combined.
- Pour the filling into the prepared springform pan. Gently tap the pan against the counter to release large air bubbles.
- Bake for 40–50 minutes, or until the edges are set and the center still has a slight jiggle.
- Remove from the oven and allow the cheesecake to cool completely.
- Cover and refrigerate for at least 4 hours, preferably overnight.
- Remove the springform ring, slice, and serve chilled with fresh berries or your preferred toppings.
Notes
For the smoothest texture, blend the cottage cheese thoroughly before adding the remaining ingredients.
Don’t overbake the cheesecake. A slight jiggle in the center is expected, and the filling will firm up as it cools and chills.
Store covered in the refrigerator for 3 to 4 days. Individual slices can also be frozen and thawed in the refrigerator.
Nutrition information will vary depending on the brands, substitutions, and serving size used.
- Prep Time: 10 minutes
- Chill Time: 4 hours
- Cook Time: 40–50 minutes
- Category: Dessert
- Cuisine: American
Why You’ll Like This Greek Yogurt Protein Cheesecake
There are a few things that make this cheesecake especially practical.
- Greek yogurt adds creaminess and protein without making the filling overly rich.
- Cottage cheese adds another source of protein and blends into a smooth filling.
- The flavor is lightly sweet and tangy, with enough lemon and vanilla to give it a familiar cheesecake taste.
- It can be made ahead, which makes it convenient for dessert or meal prep.
- The topping options are flexible. Fresh berries, sliced fruit, or a little extra Greek yogurt all work well.
The texture is important here. For the smoothest cheesecake, I recommend blending the cottage cheese thoroughly before baking. If your cottage cheese is particularly wet, draining off excess liquid can also help keep the filling from becoming too loose.
Ingredients You’ll Need
For the Cheesecake
1 cup plain Greek yogurt
Use thick, plain Greek yogurt. Full-fat, low-fat, or nonfat can work, although the final texture will vary slightly depending on the yogurt you use.
1 cup cottage cheese
I prefer small-curd cottage cheese because it blends easily. Full-fat or low-fat cottage cheese both work.
2 large eggs
Eggs help the cheesecake set and give the filling its soft, custard-like texture.
1/3 cup granulated sugar
This provides a moderate amount of sweetness. You can adjust it slightly to suit your preference.
2 tablespoons cornstarch
Cornstarch helps the cheesecake firm up as it cools and makes it easier to slice.
1 teaspoon vanilla extract
Vanilla rounds out the tangy dairy flavors.
1 tablespoon fresh lemon juice
A little lemon brings out the classic cheesecake flavor without making the filling taste strongly of lemon.
Pinch of salt
A small amount balances the sweetness.
Optional Topping Ideas
Try serving the cheesecake with:
- Fresh strawberries or blueberries
- Raspberries
- A spoonful of Greek yogurt
- A light drizzle of honey
- Fresh lemon zest
- A few thin slices of fruit
How to Make Greek Yogurt Protein Cheesecake
1. Prepare the pan
Preheat the oven to 325°F.
Lightly grease a 9-inch springform pan. You can also line the bottom with parchment paper to make the cheesecake easier to remove.
If you prefer a slightly thicker cheesecake, an 8-inch springform pan can also work, but you may need to add a little baking time.
2. Blend the cottage cheese
Add the cottage cheese to a blender or food processor and blend until very smooth.
This step makes a noticeable difference in the finished texture. You don’t want small curds throughout the cheesecake, so keep blending until the mixture looks creamy.
3. Make the filling
Add the Greek yogurt, eggs, sugar, cornstarch, vanilla extract, lemon juice, and salt to the blended cottage cheese.
Blend again just until everything is smooth and combined.
Avoid blending for much longer than necessary. Once the filling is smooth, you’re ready to bake.
4. Pour into the pan
Pour the cheesecake mixture into the prepared springform pan.
Gently tap the pan against the counter once or twice to release any large air bubbles.
5. Bake
Bake at 325°F for about 40 to 50 minutes.
The cheesecake should look set around the edges while the center still has a slight jiggle when you gently move the pan. It will continue to firm up as it cools.
Try not to wait until the center is completely firm before removing it from the oven. Overbaking can make a yogurt-based cheesecake dry or slightly rubbery.
6. Cool completely
Remove the cheesecake from the oven and let it cool at room temperature.
Once it has cooled, cover it and refrigerate for at least 4 hours, although overnight chilling gives the best texture.
The cheesecake may seem softer when it first comes out of the oven. Give it time to cool and chill before judging the final consistency.
7. Slice and serve
Once thoroughly chilled, run a thin knife around the edge of the cheesecake before removing the springform ring.
Slice with a sharp knife. For cleaner slices, wipe the knife between cuts.
Serve plain or add your favorite toppings just before serving.
Tips for the Best Results
Blend the cottage cheese until completely smooth
This is one of the most important steps. Even if you don’t mind cottage cheese in other recipes, visible curds aren’t what you want in a cheesecake.
A blender or food processor works better than simply stirring the ingredients together.
Use thick Greek yogurt
A thick Greek yogurt gives the filling a better starting texture. If your yogurt is unusually thin or watery, the cheesecake may take longer to set.
Don’t overbake it
A slight jiggle in the middle is a good thing when the cheesecake comes out of the oven.
The center should not look completely liquid, but it also shouldn’t be firm like a fully baked cake. The cheesecake will continue setting as it cools and chills.
Let it chill long enough
This isn’t a dessert I recommend rushing.
For the cleanest slices and creamiest texture, refrigerate the cheesecake for at least four hours. Overnight is even better if you have the time.
Watch your protein powder substitutions
This recipe doesn’t require protein powder, which I like because the dairy ingredients provide the protein while keeping the cheesecake texture creamy.
If you decide to experiment with protein powder, start with a small amount. Different whey, casein, and plant-based powders absorb liquid differently and can make the filling thicker or drier.
Variations and Substitutions
Use a different Greek yogurt
Plain Greek yogurt is the simplest choice, but you can use a different fat percentage based on what you keep in your refrigerator. Just keep in mind that the texture and richness may change slightly.
Try a graham cracker crust
For a more traditional cheesecake, you can bake the filling over a prepared graham cracker crust.
A simple crust can be made with crushed graham crackers, melted butter, and a little sugar. Press the mixture firmly into the bottom of the springform pan before adding the filling.
The crust will add sweetness and richness, so you may want to adjust the topping accordingly.
Add berries
Fold fresh or frozen berries into the batter, or use them as a topping.
If using frozen berries, there’s no need to thaw them first, but they may release some extra moisture and create streaks of color throughout the cheesecake.
Make it more lemon-forward
For a stronger lemon flavor, add a little finely grated lemon zest along with the lemon juice.
I prefer zest when I want more lemon flavor because it adds plenty of citrus aroma without adding much extra liquid.
Change the topping
Fresh berries are my usual choice, but sliced peaches, strawberries, raspberries, or blueberries all work nicely.
You can also keep things simple with a spoonful of Greek yogurt and a little lemon zest.
How to Serve It
This Greek yogurt protein cheesecake is best served cold.
For a simple dessert, add fresh berries just before serving. If you want a little extra sweetness, drizzle a small amount of honey over each slice.
You can also serve smaller slices as an afternoon snack or keep individual portions in the refrigerator for an easy make-ahead dessert, the same way we prep our other make-ahead protein desserts.
Storage and Meal Prep
Keep the cheesecake covered and refrigerated.
It should be used within 3 to 4 days for best quality.
If you’re preparing it ahead, I recommend leaving the cheesecake whole and slicing it as needed. This helps prevent the cut edges from drying out.
You can also freeze individual slices. Wrap each slice well and place it in a freezer-safe container. Thaw the slices in the refrigerator before serving.
The texture may be slightly softer after freezing and thawing, but it should still be enjoyable when properly stored.
Protein Notes
The main protein sources in this cheesecake are Greek yogurt, cottage cheese, and eggs. Using a Greek yogurt with a higher protein content can increase the protein in the finished dessert.
The exact amount will depend on the brands and types of dairy products you use, as well as the final number of servings.
The total protein and nutrition values will vary depending on the brands, substitutions, and serving size used.
Frequently Asked Questions
Can I make this cheesecake without protein powder?
Yes. Protein powder isn’t necessary for this recipe. Greek yogurt, cottage cheese, and eggs provide the main protein sources while keeping the filling creamy.
Why is my cheesecake still soft after baking?
That’s normal if you’ve just taken it out of the oven. The cheesecake should have a slight jiggle in the center and will become firmer as it cools and chills.
Make sure to refrigerate it for at least four hours before slicing.
Can I use nonfat Greek yogurt?
Yes. Nonfat Greek yogurt can be used, although the finished cheesecake may be slightly less rich than one made with full-fat yogurt.
The thickness of the yogurt also matters, so choose a thick Greek-style yogurt when possible.
Can I use a regular yogurt instead of Greek yogurt?
You can, but regular yogurt contains more liquid and may produce a softer filling. If you make the substitution, choose a thick yogurt and expect the texture to be somewhat different.
Can I freeze Greek yogurt protein cheesecake?
Yes. Individual slices can be wrapped well and frozen in an airtight, freezer-safe container.
Thaw them in the refrigerator rather than at room temperature. The texture may change slightly after freezing.
Why do I need to blend the cottage cheese?
Blending breaks down the cottage cheese curds and creates a smoother filling. For a cheesecake with a classic creamy texture, I recommend blending until no visible curds remain. Once you have made these, give our No-Bake Protein Cheesecake Bites a go.
Final Thoughts
I like this Greek yogurt protein cheesecake because it keeps the familiar creamy, tangy character of cheesecake while using simple ingredients you can find at most grocery stores. Make it ahead, let it chill thoroughly, and add whatever fruit or topping you have on hand when you’re ready to serve it.